Voice-overs have long been an integral part of visual storytelling, offering a unique blend of context, emotion, and clarity to various multimedia formats. From instructional content to entertaining stories, voice-overs bridge the gap between the viewer’s understanding and a creator’s intent. This extensive article will comprehensively discuss how to voice over a video, guiding you through their creation process and highlighting leading software solutions.
What is a Voice-Over?
Voice-over refers to a production technique in which a voice, not originating from the scene, narrates or comments on what’s unfolding on-screen. In essence, it’s an unseen narrator or commentator.
Applications of voice-overs span various sectors:
- Advertisements: For radio and television commercials, a voice-over can describe the product, offer, or service while setting the desired tone for the advertisement.
- E-Learning: Online courses often use voice-overs to explain concepts, narrate slides, or provide instructions.
- Documentaries: Narration is a key element in documentaries, guiding the viewer through the story, providing context, and adding depth.
- Animation & Cartoons: Animated characters require voice actors to bring them to life, making voice-overs essential in this medium.
- Video Games: From in-game narration to character dialogues, voice-overs play a significant role in enhancing the gaming experience.
- Corporate Videos: Companies may use voice-overs for training materials, product demos, or promotional content.
- Audiobooks: A voice-over artist reads the text, transforming written content into an audio format for listeners.
- Podcasts: While many podcasts are conversational, some segments, like introductions, might utilize voice-overs.
- Voice Assistants & IVR: Systems like Siri, Alexa, or telephone interactive voice response systems use voice-overs for user interaction.
- Film: While films primarily rely on live dialogue, some scenes or genres, such as noir films, utilize voice-over narrations.
- Tours: Audio guides for museums, historical sites, or even city tours utilize voice-overs to provide information to visitors.
- Presentations: Corporate or academic presentations might use voice-overs to accompany slides, especially when shared digitally.
- Trailers & Promos: Movie trailers, event promos, or book teasers often incorporate voice-overs to generate excitement and intrigue.
- Public Announcements: Airports, train stations, and other public places use voice-overs for announcements to guide and inform the public.
Detailed Guide to Making a Voice-Over
Creating an effective voice-over is an intricate process, demanding meticulous attention at every stage. Here’s a comprehensive guide:
Step 1. Scriptwriting
Scriptwriting serves as the foundation of any voice-over project, ensuring that the narrative is clear, compelling, and effectively communicates the intended message. A well-written script provides guidance and structure, allowing voice-over artists to infuse the right emotion, pacing, and tone into their delivery. It acts as a roadmap, helping the artist understand the nuances and emphasis required at various points in the narrative. Additionally, a meticulously crafted script eliminates ambiguity, reduces the chances of errors or retakes, and ensures that the final voice-over aligns seamlessly with any corresponding visuals or broader project goals. In essence, scriptwriting for voice-over is a crucial step in guaranteeing the clarity, engagement, and overall success of the auditory content.
Begin by understanding your target audience and the message’s core objective. This foundational insight will guide the script’s tone, whether it’s conversational, formal, persuasive, or informative. Keep sentences concise and straightforward, avoiding jargon or complex terms unless they’re integral to the message. Incorporate natural pauses, which not only aid the speaker in delivering the script but also give listeners moments to process the information. Always read the script aloud, preferably multiple times, to ensure it flows smoothly and sounds authentic when spoken. Additionally, provide pronunciation guides for uncommon words or names, ensuring the voice-over artist can articulate them correctly. Finally, always conclude with a clear call-to-action or summary, reinforcing the script’s primary message or goal. Remember, the voice-over script is the blueprint of your audio content; investing time and thought into its creation will invariably result in a more impactful final product.
Tip 1: Pinpoint your audience’s demographics and tailor your content accordingly. A younger audience might appreciate a more casual tone, while older viewers might prefer formality.
Tip 2: Conversational tones generally work best, as they’re easy to follow and engage with.
Tip 3: Read the script multiple times, preferably aloud. This helps in gauging the flow and making necessary amendments.
Step 2. Choosing the Right Voice
Selecting the appropriate voice for a voice-over is pivotal to the success of the message you’re conveying. Start by considering the target audience and the nature of the content. For instance, a youthful, energetic voice may resonate better with a younger demographic, while a mature, authoritative tone might be preferred for instructional or serious content. Think about the emotion you want to evoke: is it excitement, trust, sadness, or nostalgia? The chosen voice should naturally align with that sentiment. Gender, accent, and pitch can also influence perceptions and should be selected based on the cultural and contextual expectations of the listeners. It’s helpful to request samples or auditions from potential voice-over artists to gauge how well they fit the desired profile. By aligning the voice-over attributes with the content’s purpose and the audience’s expectations, you enhance the impact and efficacy of your message.
Tip 1: If your content is somber, a mellow, deep voice might work best. Conversely, cheerful content demands an upbeat voice.
Tip 2: Use platforms like Voices.com, Fiverr, or Casting Call Club to explore a vast array of voice talents.
Deciding whether to hire professional artists for a voice-over or to take a DIY approach depends on various factors. Both approaches have their advantages and drawbacks. Here’s a breakdown to help you make an informed decision:
Advantages of Hiring Professional Voice-Over Artists:
- Quality: Professional artists possess the training and experience to deliver high-quality recordings. Their expertise allows them to modulate their voice according to the script’s needs, ensuring clarity and the desired emotional impact.
- Equipment: Professionals often have access to high-end recording equipment and soundproof studios, ensuring clear recordings without background noise.
- Time-Efficient: A professional can often deliver a polished product faster, as they are familiar with the nuances of recording and can nail the desired tone quickly.
- Versatility: A professional artist might be able to offer a range of voice tones, accents, or modulations to fit different requirements.
- Post-Production: Many professionals or agencies offer post-production services, ensuring the final audio is cleaned, edited, and ready for integration.
Drawbacks of Hiring Professional Voice-Over Artists:
- Cost: Hiring a professional can be expensive, especially if you’re working with top-tier talent or need multiple recordings.
- Availability: Popular voice-over artists might have busy schedules, leading to potential delays.
- Less Personal Touch: If the content is personal or if the voice-over is for a personal brand, using an external voice might feel less authentic to the audience.
Considerations for DIY Voice-Overs:
- Cost-Effective: Recording your own voice-over can save money, especially if it’s a one-time project or for a small audience.
- Personal Touch: For certain projects, like personal vlogs or brand messages, your own voice might resonate more with your audience.
- Flexibility: You can record as many times as you want and make changes on the fly.
Step 3. Setting Up a Recording Environment
Creating an optimal recording environment is essential for capturing clear and professional-sounding voice-overs. To begin, select a quiet room away from external noises like traffic or household appliances. Soft surfaces absorb sound, so consider rooms with carpeting or add soft furnishings like cushions, blankets, or drapes. These can help minimize sound reflections and echoes. If possible, invest in acoustic foam panels or bass traps to further enhance sound absorption. To prevent external noises from seeping in, ensure windows and doors are well-sealed; you can use weather stripping or draft stoppers for this purpose. Maintain a consistent room temperature to avoid equipment malfunctions and to ensure comfort during recording sessions. Lastly, set up your microphone on a stable surface or a boom stand, away from any direct airflow or sources of vibration. Pair it with a pop filter to reduce plosive sounds, and wear noise-canceling headphones to monitor your recording in real-time.
Tip 1: Curtains, carpets, and soft furnishings can minimize echoes and unwanted noises.
Tip 2: If you can’t soundproof a room, consider using portable sound shields around your microphone.
Tip 3: Speak across the microphone, not directly into it, to prevent distorted ‘p’ and ‘b’ sounds.
Step 4. Recording
Selecting the right microphone is paramount in achieving professional-quality voice-overs. The microphone’s purpose is not just to capture sound but to ensure that the voice remains clear, authentic, and free from unwanted noise or interference. While there are numerous microphones available in the market, it’s crucial to consider factors such as the microphone’s pickup pattern, sensitivity, and frequency response. A popular choice among voice-over artists is the large diaphragm condenser microphone, known for its wide frequency response and sensitivity, making it ideal for capturing the nuances of the human voice. However, the environment in which you’re recording also plays a role. If you’re in a less-than-ideal space with background noise, a dynamic microphone or a shotgun microphone might be preferable due to their directional pickup patterns. Investing in a good-quality microphone, while also considering your recording environment, will ensure your voice-over projects stand out in clarity and professionalism.
When recording a voice-over, pay attention to the speaker’s clarity and tone. Firstly, hydration is essential; ensure you drink water to keep your vocal cords lubricated, preventing cracks or unnecessary vocal friction. Always warm up your voice with simple exercises to enhance flexibility and range. Maintain a consistent distance from the microphone to ensure uniform volume and minimize plosive sounds (like ‘p’ and ‘b’). If unfamiliar words or technical jargon are in the script, take time to research and practice their pronunciation beforehand. Emphasize natural pauses for breaths, and avoid rushing; this not only aids in post-production but also makes your delivery more understandable. Lastly, but most importantly, understand the emotion or tone the script demands. Whether it’s excitement, empathy, or authority, ensuring your voice aligns with the narrative’s intent can transform a simple recording into a compelling voice-over.
Tip 1: While USB microphones are good for beginners, consider XLR microphones for better sound quality as you progress.
Tip 2: Stand up to allow diaphragmatic breathing. It results in a stronger voice and better stamina.
Tip 3: Avoid caffeinated beverages as they can affect voice quality. Stay hydrated with water.
Step 5. Editing
Editing is an essential phase in the voice-over production process, ensuring the final audio is polished, cohesive, and free of distractions. During editing, extraneous sounds—like clicks, pops, or extended pauses—are removed to ensure fluidity. Equalization might be employed to enhance or minimize certain frequencies, making the voice sound clearer and more balanced. Compression can be applied to even out the audio levels, preventing sudden spikes in volume. Background noise, a common nemesis in recordings, can be reduced or eliminated using specialized filters or noise gates. Effects like reverb or delay might be judiciously added to suit specific project needs or to create a desired ambience. It’s also during this phase that pacing can be adjusted; sections of the audio can be sped up or slowed down to fit time constraints or to enhance the narrative flow. Editing transforms the raw recording into a professional and captivating voice-over, ensuring the listener’s focus remains solely on the message.
Tip 1: Identify consistent disturbances and use noise reduction tools to eliminate them.
Tip 2: Use bass boost to add depth to deeper voices and treble boost to enhance clarity in higher-pitched voices.
Tip 3: Keep the volume of background music low to ensure the voice-over remains dominant.
Step 6. Syncing with Video
Syncing voice-over with video ensures a cohesive and seamless viewing experience. The synchronization process involves aligning the audio narration accurately with the visual elements, so the spoken content corresponds with the on-screen action, transitions, and cues. This is especially vital when the voice-over is explaining, commenting on, or reacting to specific visual content. Video editing software typically provides a timeline feature where both audio and video tracks can be viewed and adjusted simultaneously. By carefully observing the video and adjusting the placement and timing of the voice-over track, creators can achieve precise synchronization. Adjusting the pace of speech, inserting pauses, or trimming the audio might be necessary to ensure perfect alignment. When successfully synced, the voice-over enhances the visual narrative, providing context, emotion, and depth, ultimately leading to a more engaging and immersive audience experience.
Tip 1: Use visual cues or markers to pinpoint where each voice-over segment should begin.
Tip 2: Adjust video speed or cut short irrelevant parts to ensure the voice-over and video run seamlessly.
Here are some software options that can assist in this process:
- Adobe Premiere Pro: This is a professional video editing software that offers comprehensive tools for syncing audio with video. With its “Merge Clips” feature, users can easily sync up voice-over recordings with the corresponding video segments.
- Final Cut Pro X: Popular among Mac users, Final Cut Pro X offers a user-friendly interface with a robust “Synchronize Clips” feature. It automatically aligns audio and video tracks using audio waveforms.
- DaVinci Resolve: This software is not only known for its color grading capabilities but also for its advanced audio sync features. Its “Auto-Align” tool can be used to match voice-over tracks with video.
- PluralEyes: A standalone software by Red Giant, PluralEyes is specifically designed to sync audio with video. It’s compatible with many professional video editing software platforms, making the syncing process quick and straightforward.
- Sony Vegas Pro: This is another comprehensive video editing tool that provides intuitive audio syncing capabilities. The software allows for manual alignment as well as automatic syncing based on audio waveforms.
The choice of software largely depends on the project’s complexity, your budget, and personal preferences. Some of these software options come with a steep learning curve, especially for beginners, so it’s beneficial to invest time in tutorials or training to make the most of their capabilities.
Top 5 Software for Voice-Over
When diving into the realm of voice-overs, the software you choose becomes an invaluable partner in crafting your vision. Below, we delve deeper into the top five software options for voice-over work:
Adobe Audition
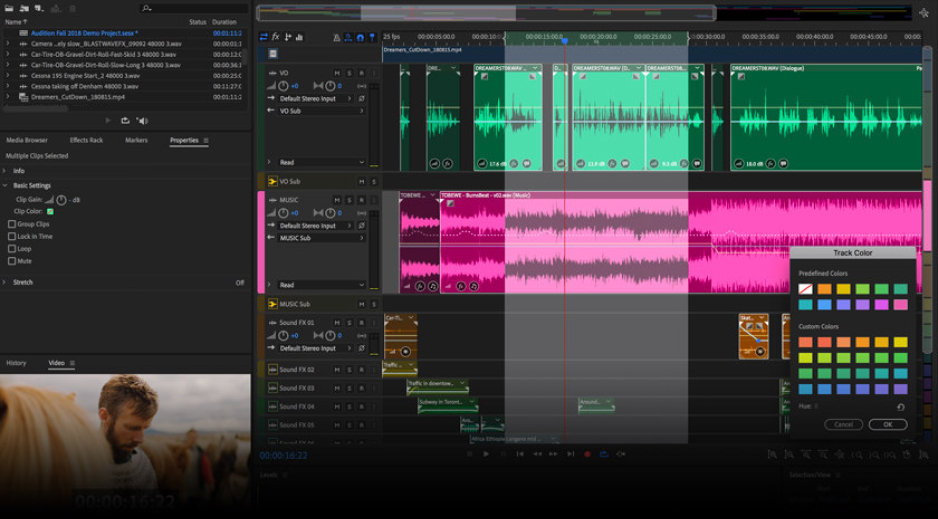
A powerhouse in the digital audio workstation domain, Adobe Audition is part of the renowned Adobe Creative Cloud suite. It has grown from a simple sound editing program into a comprehensive audio post-production suite. With tools designed for both audio restoration and intricate sound design, Audition provides a professional environment for those focused on delivering pristine audio quality. Its seamless integration with Adobe Premiere Pro also ensures that video creators can smoothly toggle between video and audio editing.
Features:
- Multitrack Editor: Facilitates simultaneous editing of multiple tracks.
- Waveform Editing: Offers granular control over individual audio channels.
- Spectral Frequency Display: A visualization of frequencies aids in noise identification.
- Advanced Sound Design: Craft intricate soundscapes or effects.
- Integration with Adobe Suite: Smooth workflow with Premiere Pro and other Adobe products.
Best for: Audio professionals, podcasters, and users who are already integrated into the Adobe workflow.
Getting Started:
- Launch Adobe Audition.
- Select File > New > Audio File to start a new project.
- Name your file and set your desired sample rate and bit depth.
Recording:
- Connect your microphone.
- Under the Multitrack dropdown, select your input source (your microphone).
- Click the red Record button and start speaking.
Editing:
- Use the Selection Tool to highlight unwanted sections and press Delete.
- To add effects, go to the Effects tab and choose from the extensive list. Adjust parameters as needed.
Exporting:
- Go to File > Export > File.
- Choose your format (e.g., MP3, WAV) and adjust the settings.
- Click Save.
Audacity
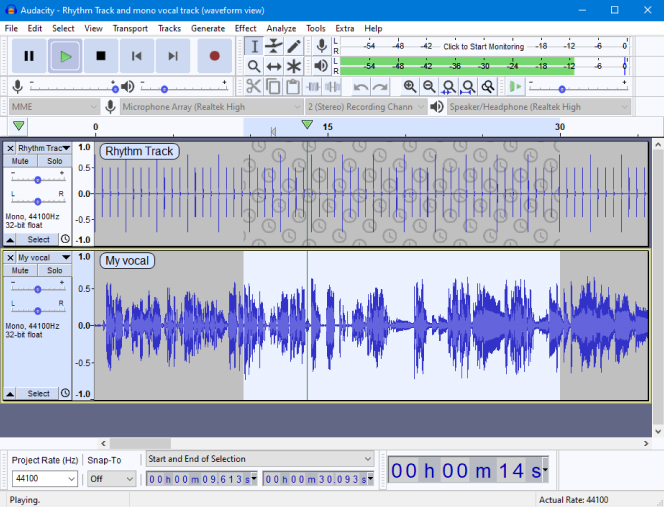
Widely regarded as the go-to software for entry-level audio editing, Audacity’s open-source nature belies its powerful capabilities. It provides a vast array of tools that are comparable to those in premium software. Whether you’re stitching together interviews, removing noise from recordings, or applying effects, Audacity’s straightforward interface and robust feature set serve as a welcoming platform for novices while still offering the depth sought by advanced users.
Features:
- Live Audio Recording: Capture sound from multiple sources.
- Broad File Support: Compatible with numerous audio file formats.
- Digital Effects & Plugins: Amplify, normalize, or add reverb among other effects.
- Audio Analysis: Deep dive into audio stats with tools like ‘Plot Spectrum’.
- Multi-Tool: Seamless transition between different editing functions.
Best for: Beginners in audio editing, hobbyists, podcasters, and those looking for a powerful tool without financial constraints.
Getting Started:
- Open Audacity.
- Configure your microphone via Edit > Preferences > Devices.
Recording:
- Click the red Record button.
- Begin speaking into your microphone.
Editing:
- Highlight sections to edit with your cursor.
- Use the toolbar to cut, copy, paste, or delete segments.
- Access effects under the Effect menu.
Exporting:
- Select File > Export.
- Choose your desired format and settings, then click Save.
GarageBand
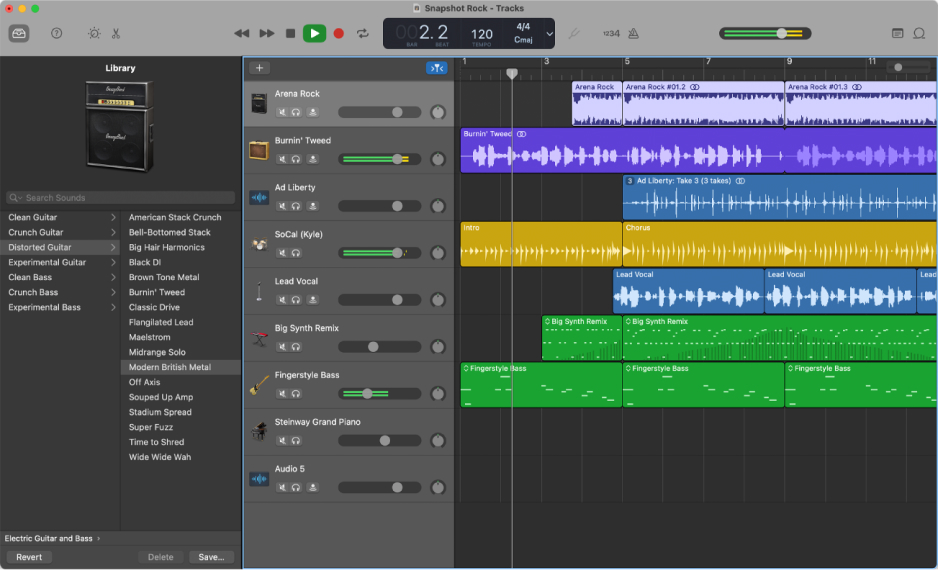
Exclusively designed for the Apple ecosystem, GarageBand serves as the entry point for countless music and podcast creators. With its intuitive interface, users can seamlessly transition from crafting melodies with virtual instruments to recording voice-overs or podcasts. The software’s impressive library and built-in lessons for instruments make it a valuable tool for creatives, irrespective of their proficiency in music.
Features:
- Virtual Instruments: Emulate a wide variety of musical instruments.
- Voice Presets: Various settings tailored for different vocal needs.
- Smart Controls: Easily modulate musical elements.
- Drummer: A virtual percussionist to augment your tracks.
- Integration with Logic Remote: Remote control GarageBand using iOS devices.
Best for: Apple aficionados, budding musicians, and content creators desiring a user-friendly interface.
Getting Started:
- Launch GarageBand.
- Choose Empty Project, then select the Voice template.
Recording:
- Connect your microphone.
- Click the red Record button and begin speaking.
Editing:
- Use the playhead to navigate and select sections.
- Drag to rearrange, or use the edit controls to cut, copy, or delete.
- Add effects from the right sidebar.
Exporting:
- Go to Share > Export Song to Disk.
- Choose your format and quality, then click Export.
Logic Pro X
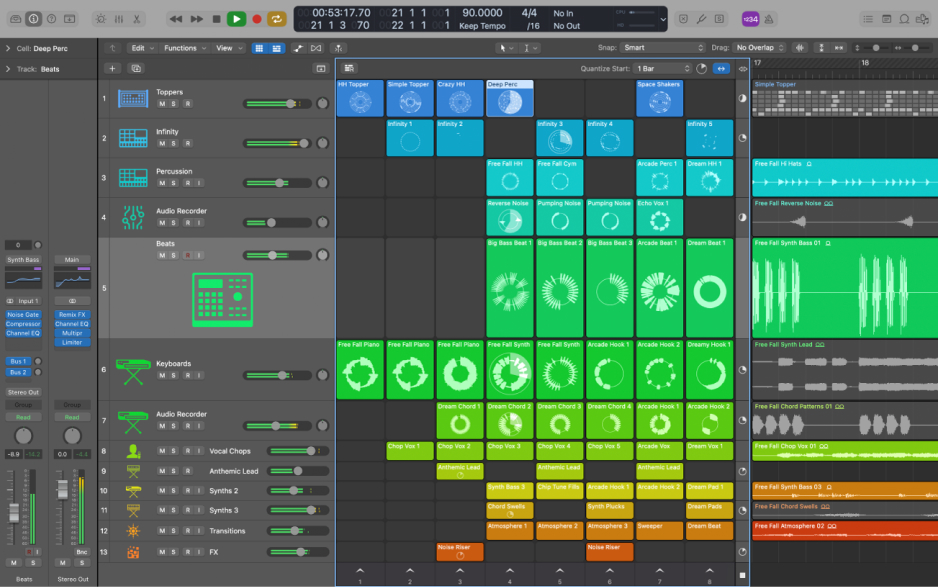
Standing as the pinnacle of Apple’s audio software, Logic Pro X extends the capabilities introduced by GarageBand. Tailored for professionals, it brings advanced mixing, editing, and recording tools to the table. Its extensive sound library, superior MIDI functionalities, and advanced rhythm generation tools make it a compelling choice for those wanting to push the boundaries of audio production.
Features:
- Advanced Mixing & Editing: Precision tools for refined audio.
- MIDI Capabilities: Detailed sequencing of software and hardware instruments.
- Sound Library: An exhaustive collection of sounds, instruments, and loops.
- Smart Tempo: Synchronize tempo across all content.
- Alchemy Synth: Transform and craft unique sounds with this synthesis engine.
Best for: Professional sound engineers, seasoned musicians on the Mac platform, and those requiring comprehensive audio manipulation tools.
Getting Started:
- Open Logic Pro X.
- Select File > New to create a new project.
- Choose an Empty Project and configure your microphone as the input source.
Recording:
- Click the red Record button on the transport bar.
- Start your voice-over.
Editing:
- Use the playhead and marquee tool for selecting sections.
- Cut, copy, paste, or delete using the edit controls.
- Add effects from the Mixer window or via the Inserts section.
Exporting:
- Go to File > Export > All Tracks as Audio Files.
- Choose your format and save location.
Pro Tools
Developed by Avid Technology, Pro Tools has long been considered the industry standard in audio production. Used in countless professional studios globally, its reputation for stability, advanced features, and high-quality audio production is unparalleled. The software offers everything from recording to post-production tools, making it the comprehensive choice for large-scale projects and studio setups.
Features:
- HD Audio: Capture and edit with up to 192 kHz resolution.
- Elastic Audio: Make tempo and timing edits without compromising sound quality.
- MIDI Editor: Streamline MIDI recording and editing tasks.
- Cloud Collaboration: Real-time collaboration for global projects.
- Advanced Metering: Accurate visual insights into dynamics and levels.
Best for: Top-tier sound engineers, studios, music producers, and professionals who prioritize quality and consistency.
Getting Started:
- Launch Pro Tools.
- Choose File > New Session to start a new project.
Recording:
- Connect your microphone and set it as the input source.
- Create a new track (Track > New).
- Arm the track for recording and click the red Record button.
Editing:
- Use the Selector Tool to highlight areas.
- Edit using the toolbar or the Edit menu.
- To add effects, use the Mix window and choose from the available plugins.
Exporting:
- Go to File > Bounce > To Disk.
- Select your desired format and settings, then click Bounce.
Tips for Choosing Software to Make a Voice-Over
When selecting software for creating a voice-over, it’s crucial to consider various aspects that go beyond just basic recording. Here are some unique tips to help you make an informed choice:
- Interactive UI/UX: Choose software that offers an intuitive and user-friendly interface. For those new to audio editing, a clean and well-organized layout can make the learning curve less steep.
- Specialized Restoration Tools: If you’re recording in less-than-ideal conditions, software with advanced noise removal and audio restoration tools can be a lifesaver.
- Non-Destructive Editing: Opt for software that allows you to make changes without permanently altering the original audio file. This feature is especially handy when you need to revert to a previous version.
- Batch Processing: If you’re working on projects with multiple files, software that offers batch processing can save time. This lets you apply effects, conversions, or edits to several files simultaneously.
- Plugin Compatibility: The ability to integrate third-party plugins can expand the software’s capabilities, offering you specialized tools tailored to your needs.
- Varied Export Options: Look for software that provides diverse export settings. This ensures compatibility with various platforms, whether you’re uploading your voice-over to a website, integrating it into video software, or using it in a mobile app.
- Real-Time Monitoring: Software that allows real-time effects monitoring lets you hear changes as you make them, streamlining the editing process.
- Customizable Keyboard Shortcuts: Speed up your workflow by opting for software that lets you customize shortcuts. This is particularly useful for tasks you find yourself repeating often.
- Regular Updates & Support: Reliable customer support and frequent software updates indicate a commitment from the software provider to keep up with evolving industry standards and user needs.
- Community & Resources: Software with an active online community can be invaluable. Forums, tutorials, and user-created content can provide insights, troubleshooting tips, and tricks that aren’t always available in official documentation.
- Compatibility with External Hardware: Ensure the software seamlessly integrates with any external recording hardware you have, such as mixers, audio interfaces, or specialized microphones.
- Cloud Integration: Some modern software options offer cloud integration, allowing you to access, edit, and collaborate on your voice-over projects from anywhere.
- Preset & Template Options: For beginners, having a range of presets or templates for common voice-over scenarios can be a helpful starting point, ensuring professional-sounding results.
When it comes to voice-over production, your choice in software can greatly influence both your workflow and the final output. While each of the mentioned software options has its strengths, selecting one depends on individual requirements, proficiency, and budget constraints.
Conclusion
Voice-over is the art of weaving narratives, bringing forth the emotion and nuance behind mere words. The technicalities of this art form, from choosing the right equipment to mastering software nuances, play a vital role in the overall impact of the finished product. Yet, beyond the intricacies of the craft lies the true essence: the human connection. It’s the voice that takes the listener on a journey, creating vivid landscapes of sound, and fostering understanding. As the media industry continues to evolve, so does the role of voice-over, reminding us of the timeless power of storytelling. Whether for entertainment, education, or advocacy, voice-overs remain an instrumental vessel for connecting, resonating, and inspiring audiences around the world.
Frequently Asked Questions
Q: How long does it typically take to produce a minute of voice-over?
A: The time it takes to produce a minute of voice-over can vary based on several factors, including script complexity, talent experience, and post-production requirements. While a seasoned voice actor might record a one-minute script in just a few takes, the subsequent editing, mastering, and syncing processes can take anywhere from 10 minutes to an hour (or even more) per minute of audio, depending on the project’s intricacy.
Q: Can I use my smartphone for voice-over recordings?
A: While smartphones have advanced microphones, they often don’t match the quality of professional recording equipment. However, in a pinch or for less critical applications, they can suffice. Always ensure you’re in a quiet environment, possibly use an external microphone compatible with your phone, and leverage audio editing apps to refine the recording.
Q: Why does my voice sound different in recordings compared to what I hear naturally?
A: The voice you hear when you speak is influenced by vibrations conducted by your bones, giving it a fuller, lower quality. In contrast, recordings capture your voice’s external projection, which might sound sharper or thinner. This is the version most people hear when you speak.
Q: How can I handle breath sounds in my voice-over?
A: Breath sounds can be minimized in multiple ways:
- Technique: With experience, voice actors learn to control their breathing and take silent breaths.
- Placement: Adjusting the microphone’s position can reduce the prominence of breath sounds.
- Editing: Post-production software can be employed to reduce or remove unwanted breath sounds.
Q: Is there a golden rule for the length of a voice-over script?
A: There’s no one-size-fits-all rule since the script’s length should align with the content’s purpose. However, a general guideline for commercials is 150 words per minute. Remember, it’s essential to ensure clarity and maintain audience engagement, so pacing is critical.
Q: Do voice-over artists require special training or education?
A: While formal education isn’t mandatory, training can be invaluable. Voice-over workshops, courses, and coaching can provide artists with techniques, feedback, and industry insights that can significantly enhance their performance and career opportunities.
Q: How do I handle technical jargon or unfamiliar terms in my script?
A: If your script contains specialized terminology, it’s essential to provide a pronunciation guide for the voice-over artist or to discuss it with them beforehand. It ensures accuracy and professionalism in the final recording.
Q: Can background music or sound effects be added to voice-overs?
A: Absolutely. Background music and sound effects can enhance the emotional impact and context of a voice-over. However, it’s vital to ensure that they complement rather than overshadow the voice and to be wary of licensing and copyright issues when using external sources.
Q: What’s the difference between voice-over and dubbing?
A: While both involve recording voices, voice-over typically retains the original audio at a lower volume, whereas dubbing replaces the original audio entirely. Dubbing is commonly used for translating foreign films, while voice-overs are popular for commercials, documentaries, and e-learning.
Q: How do I protect my voice-over project’s copyright?
A: To safeguard your voice-over project, ensure all scripts and final recordings are stored securely. If working with freelancers or agencies, have clear contracts outlining rights and usage terms. Depending on your jurisdiction, you might also consider officially registering your work for added protection.

Chief Editor. video operator with 12 years of experience in commercial filming of advertising, TV series and short films. More than 5 years of experience in CGI and post-processing on AAA projects.
Contact me if you need help with a particular buying issue, haven’t found a product you’re interested in.