Recording your screen has become an essential resource in our modern digital landscape. Whether you’re a creative content producer, a proficient tech enthusiast, or just someone eager to showcase your screen to others, mastering the art of screen recording on Windows 7 proves to be an invaluable skill. In this extensive guide, we will delve into the most effective techniques and highly recommended software solutions for capturing your screen on this iconic operating system. Prepare yourself for an exciting expedition into the realm of screen recording!
Why Screen Recording Matters
Before we dive into the nitty-gritty of screen recording on Windows 7, let’s first understand why it matters. Screen recording serves various purposes in both personal and professional contexts. Imagine being able to:
- Create informative tutorials for your YouTube channel or website.
- Record important presentations or webinars for future reference.
- Troubleshoot technical issues and share solutions with colleagues.
- Preserve precious moments from video calls with friends and family.
- Capture in-game footage for bragging rights or content creation.
The possibilities are endless, and Windows 7 users can join the screen recording revolution with the right tools at their disposal.
Built-in Screen Recording Features
Windows 7 might not come equipped with the advanced screen recording capabilities of its successors, but it does offer some basic built-in features that can get the job done for simpler tasks.
1. Snipping Tool
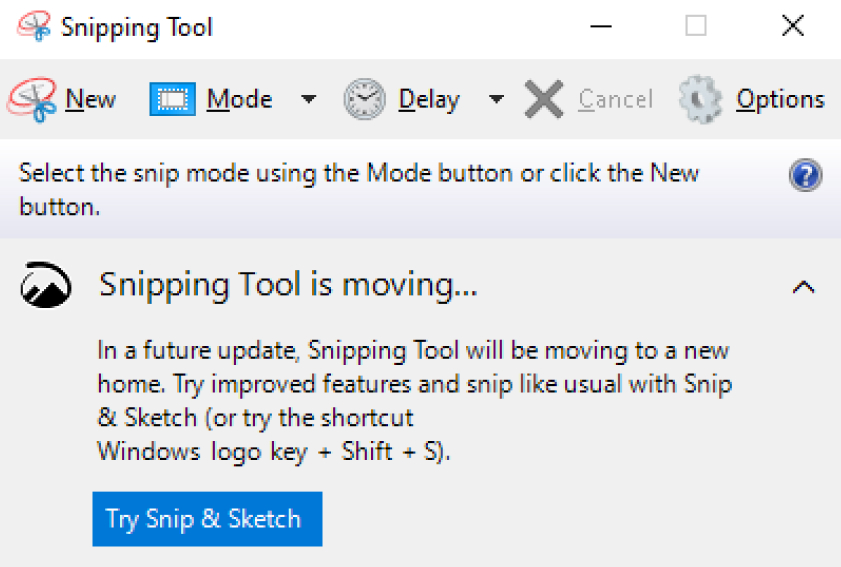
How to Access: Click on the Start button, type “Snipping Tool” into the search bar, and hit Enter.
This adaptable software serves the purpose of capturing still images through the process of screenshotting, making it perfectly suited for static image capture rather than video recording. Its intuitive interface allows individuals to effortlessly choose the specific area they wish to capture, be it a complete window, a rectangular section, a free-form shape, or even the entire display.
Furthermore, the Snipping Tool offers basic annotation features, enabling users to add highlights, text, or freehand drawings to their screenshots, making it a valuable tool for creating informative tutorials, troubleshooting guides, or simply sharing visual content. While it may not be suitable for video recording, the Snipping Tool remains a reliable option for those seeking a quick and efficient way to capture and annotate screenshots on Windows 7.
Pros:
- User-Friendly Interface: One of the standout advantages of the Snipping Tool is its simplicity. It offers a straightforward and user-friendly interface that makes it easy for beginners to capture screenshots and specific areas of the screen. This accessibility is particularly helpful for those who are not tech-savvy and need a quick way to capture visual content.
- Basic Annotation Tools: The Snipping Tool includes basic annotation features such as a pen tool and a highlighter. This allows users to mark up their captured screenshots with arrows, lines, and text to emphasize or explain certain elements. While not as robust as dedicated image editing software, these tools can be handy for simple markup tasks.
Cons:
- Limited to Static Images: Perhaps the most significant limitation of the Snipping Tool is that it can only capture static images or screenshots. It does not have the capability to record video or capture live screen activity. This limitation makes it unsuitable for those who require screen recording functionality or need to capture dynamic content.
- Lack of Advanced Features: The Snipping Tool lacks many advanced features found in dedicated screen capture software. For instance, it doesn’t offer options for scheduled captures, delayed captures, or the ability to capture specific windows or applications. Users seeking more advanced functionality may find the Snipping Tool too basic for their needs.
The Snipping Tool was first introduced in Windows Vista and remains a handy tool for capturing screenshots.
2. Problem Steps Recorder
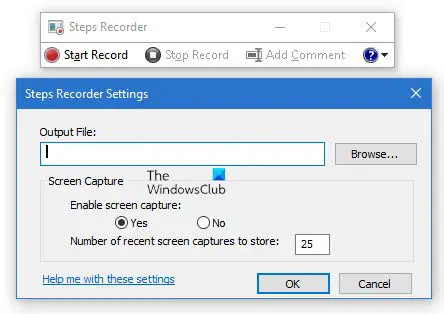
How to Access: Type “psr” in the Start menu search bar and press Enter.
Problem Steps Recorder, often abbreviated as PSR, is a hidden gem within Windows 7 that serves a unique purpose. This built-in tool is a troubleshooter’s best friend, designed specifically for capturing the steps leading up to a problem or error. When initiated, PSR records a series of screenshots, along with accompanying mouse clicks and typed comments, providing a comprehensive visual log of the user’s actions. This log is then compiled into an easily shareable and highly detailed report. This makes PSR an invaluable asset for IT support teams and anyone looking to document technical issues with clarity and precision.
While it may not be suitable for recording videos or live screen activity, its ability to capture the exact sequence of events leading to an issue makes it an essential tool for those seeking to resolve and document software or system-related problems effectively.
Pros:
- Simplified Troubleshooting: Problem Steps Recorder (PSR) is a handy tool for troubleshooting technical issues. It allows users to record and document the exact steps they took leading up to a problem or error. This makes it easier for IT support or technical experts to diagnose and resolve the issue quickly, as they have a detailed report with screenshots and descriptions.
- User-Friendly: PSR is user-friendly and doesn’t require advanced technical skills to operate. Anyone can use it to capture the steps involved in a problem, making it accessible for both novice and experienced users. Its simplicity can save time and reduce frustration when seeking technical assistance.
Cons:
- Limited to Steps and Screenshots: One of the limitations of Problem Steps Recorder is its inability to capture video or live screen activity. It only records the steps taken by the user and captures static screenshots. This can be a drawback when you need to demonstrate dynamic issues or actions that involve video playback or animations.
- No Built-In Editing or Annotation: PSR lacks built-in editing or annotation features. While it captures screenshots and steps effectively, users can’t easily add annotations or highlight specific areas on the screenshots. This limitation might require users to use additional software or tools to enhance the captured information before sharing it with others.
If you encounter technical issues, using the Problem Steps Recorder can be a lifesaver when you need to provide clear documentation for IT support.
Recommended Third-Party Screen Recording Programs
While the built-in tools are helpful for specific tasks, third-party screen recording software can elevate your Windows 7 screen recording experience to a whole new level. Let’s explore some of the top contenders:
1. OBS Studio (Open Broadcaster Software)
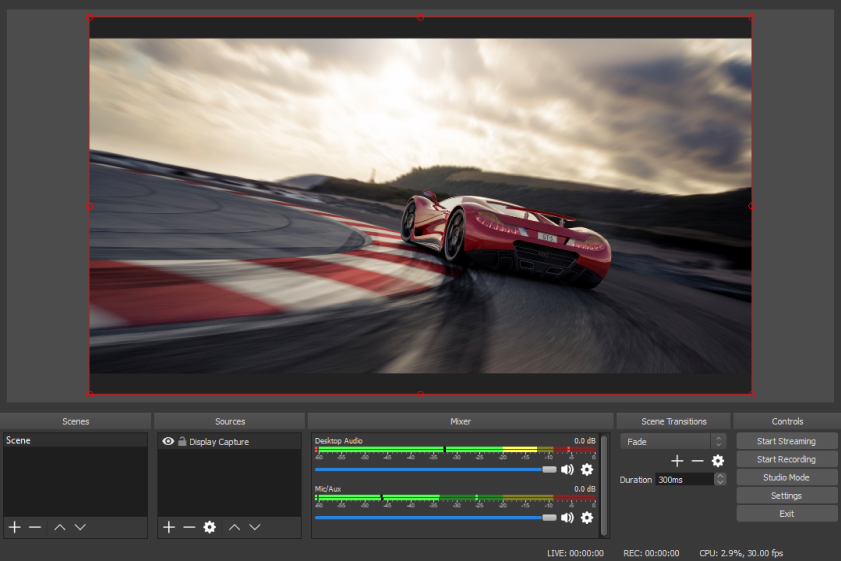
OBS Studio is an exceptional open-source screen recording and streaming software, renowned for its versatility and robust features. It stands as a powerful choice for Windows 7 users looking to capture their screens, create professional videos, or even live stream to platforms like YouTube, Twitch, or Facebook.
What sets OBS Studio apart is its ability to support multiple scenes and sources, making it perfect for crafting intricate and engaging content. Whether you’re a gamer, content creator, or educator, OBS Studio’s customization options, including hotkeys, screen capture modes, and output settings, empower you to tailor your recordings to perfection. This software’s dedication to continuous improvement and community support makes it a top pick for anyone seeking to elevate their screen recording and streaming experience on Windows 7.
What makes it great?
- Open-Source and Free: One of the biggest advantages of OBS Studio is that it is open-source software available for free. This means that anyone can use it without incurring any costs. Its open-source nature also fosters a community of developers who continually improve and update the software, adding new features and fixing bugs.
- Versatile and Customizable: OBS Studio is highly versatile and customizable. It offers a wide range of features, including the ability to capture multiple sources, such as your screen, webcam, and external devices. You can also create multiple scenes and switch between them seamlessly during recording or live streaming.
OBS Studio is a favorite among gamers and content creators for its ability to capture game footage and overlay webcam feeds.
2. ShareX

ShareX is a powerful and feature-rich open-source screen capture and screen recording tool that stands out for its remarkable versatility and customization options. Beyond its core screen recording capabilities, ShareX allows users to capture screenshots, annotate images, and even record GIFs with ease. It offers a wide array of hotkeys and capture modes, granting users precise control over their recordings.
What sets ShareX apart is its seamless integration with various online platforms, enabling direct uploads to popular image and video hosting sites like Imgur and YouTube. Additionally, its user-friendly interface, coupled with continuous updates and a supportive community, makes it an ideal choice for both tech enthusiasts and novices looking to embark on their screen recording journey.
What makes it great?
- Versatile and Feature-Rich: ShareX offers a wide range of features and customization options. Users can capture screenshots, record videos, and even perform advanced tasks like annotating images, applying filters, and editing videos within the software. This versatility makes it suitable for various use cases, from creating tutorials to capturing gameplay footage.
- Open-Source and Free: ShareX is an open-source software, which means it’s free to use and continually updated by a community of developers. This not only makes it cost-effective but also ensures that the software is regularly improved and enhanced with new features. Users don’t have to worry about subscription fees or hidden costs.
ShareX is known for its user-friendly interface and continuous updates, making it a top choice for tech enthusiasts.
3. FlashBack Express
FlashBack Express is a highly user-friendly screen recording software that excels in capturing high-quality videos on Windows 7. This versatile tool offers a range of features to enhance your screen recording experience. With FlashBack Express, you can effortlessly record your screen, add commentary using a microphone, and even include webcam footage for a more engaging presentation.
The software provides flexibility in exporting your recordings, allowing you to save them in various formats such as MP4, AVI, and WMV. Whether you’re creating tutorials, gaming content, or professional presentations, FlashBack Express simplifies the process with its intuitive interface and rich set of features, making it a top choice for both beginners and experienced users looking to capture their Windows 7 screen with ease.
What makes it great?
- User-Friendly Interface: FlashBack Express is known for its intuitive and user-friendly interface. It’s a great choice for beginners and those who want a straightforward screen recording experience without a steep learning curve. The simple layout and easy-to-navigate menus make it accessible to a wide range of users.
- High-Quality Recordings: FlashBack Express offers the capability to record high-quality videos with sharp visuals and clear audio. Users can choose from various export formats, including MP4, AVI, and WMV, allowing for flexibility in recording and sharing content. This ensures that your screen recordings look and sound professional.
Ready to add your voice and face to your screen recordings? FlashBack Express has got you covered!
4. TinyTake
TinyTake is a lightweight yet feature-packed screen recording and screenshot capture tool that excels in simplicity and user-friendliness. With its intuitive interface, users can effortlessly capture their screen activities, whether it’s for creating tutorials, capturing gameplay, or documenting software issues.
TinyTake goes beyond basic recording by offering essential editing tools, allowing users to trim and annotate their recordings on the fly. Moreover, it offers seamless sharing options via a secure cloud-based platform, making it a breeze to collaborate and distribute your recordings. If you’re new to screen recording and seek an uncomplicated yet effective solution, TinyTake is an excellent choice that prioritizes accessibility and functionality.
What makes it great?
- User-Friendly Interface: TinyTake is known for its simplicity and ease of use. Its intuitive interface makes it accessible to both beginners and experienced users. You can quickly navigate through the software, set up recordings, and make basic edits without a steep learning curve.
- Cloud Integration: TinyTake offers seamless cloud integration, allowing you to easily store and share your recorded videos online. This feature is particularly beneficial for collaboration, as you can share your recordings with others by generating shareable links or inviting team members to access specific content stored in the cloud.
If you’re new to screen recording, TinyTake is an excellent choice to start with due to its user-friendly interface.
5. Bandicam

Bandicam is a feature-rich and highly reputable screen recording and game capture software that offers Windows 7 users an exceptional recording experience. This versatile program allows users to capture their screens with remarkable clarity and precision, thanks to its support for high-quality video recording up to 4K resolution.
Bandicam’s standout feature is its ability to record gameplay with minimal system performance impact, making it a favorite among gamers and content creators. Additionally, it offers a wide array of recording options, such as webcam overlay, real-time drawing, and scheduled recording, empowering users to customize their videos to perfection. Bandicam’s intuitive interface and robust set of features make it a top choice for those seeking professional-grade screen recording on Windows 7.
What makes it great?
- High-Quality Video Capture: Bandicam is known for its ability to capture high-quality videos with minimal loss of image and audio quality. It supports recording in resolutions up to 4K Ultra HD, making it suitable for recording gameplay, tutorials, or any content where video quality is crucial.
- Advanced Features: Bandicam offers a range of advanced features, such as real-time drawing and annotations during recording, scheduled recordings, and the ability to record external video devices like webcams and HDMI capture devices. These features make it a versatile tool for content creators and professionals.
Bandicam offers a free version with limited features, making it accessible for users with varying needs and budgets.
Screen Recording Tips and Tricks
Now that you have a range of third-party software options at your fingertips, let’s explore some tips and tricks to help you make the most of your screen recording endeavors:
1. Optimize Your Settings
Before hitting the record button, take a moment to configure your recording settings. Adjust the frame rate, resolution, and audio settings to suit your needs. Higher frame rates are ideal for capturing fast-paced action, while lower ones save space and ensure smoother playback.
2. Use Hotkeys
Most screen recording software allows you to set up hotkeys for starting, pausing, and stopping recordings. Learning these shortcuts can streamline your recording process and prevent awkward pauses in your videos.
3. Check Your Storage Space
Recording high-quality videos can quickly consume your hard drive space. Ensure you have enough storage available to accommodate your recordings, especially if you plan on capturing lengthy sessions.
4. Practice Makes Perfect
Don’t be discouraged if your first few recordings don’t turn out exactly as you hoped. Screen recording, like any skill, improves with practice. Experiment with different settings and techniques to find what works best for you.
Conclusion
In a world where visual communication is king, knowing how to screen record on Windows 7 opens up a realm of possibilities. From sharing your knowledge through tutorials to preserving memorable moments, screen recording is a versatile tool that can benefit everyone. With the recommended third-party programs and the tips and tricks shared in this guide, you’re well-equipped to dive into the exciting world of screen recording. So, go ahead, hit that record button, and let your creativity shine on the digital stage!

Chief Editor. video operator with 12 years of experience in commercial filming of advertising, TV series and short films. More than 5 years of experience in CGI and post-processing on AAA projects.
Contact me if you need help with a particular buying issue, haven’t found a product you’re interested in.