

Capturing screen recordings on a Mac can be incredibly useful for a variety of reasons, such as creating tutorials, recording gameplay, or sharing a quick run-through of a presentation with colleagues or friends. Here’s a comprehensive guide to screen recording on your Mac, complete with audio. We’ll explore five distinctive methods, each with detailed instructions and overviews.
1. Using QuickTime Player
QuickTime Player is a multifunctional media player that comes pre-installed on Macs. Aside from playing videos, it also has recording capabilities that allow users to effortlessly capture screen recordings, audio, and even movie recordings.
- Launch QuickTime Player: You can find QuickTime Player in the Applications folder or easily access it using Spotlight Search (Command + Space and type “QuickTime Player”).
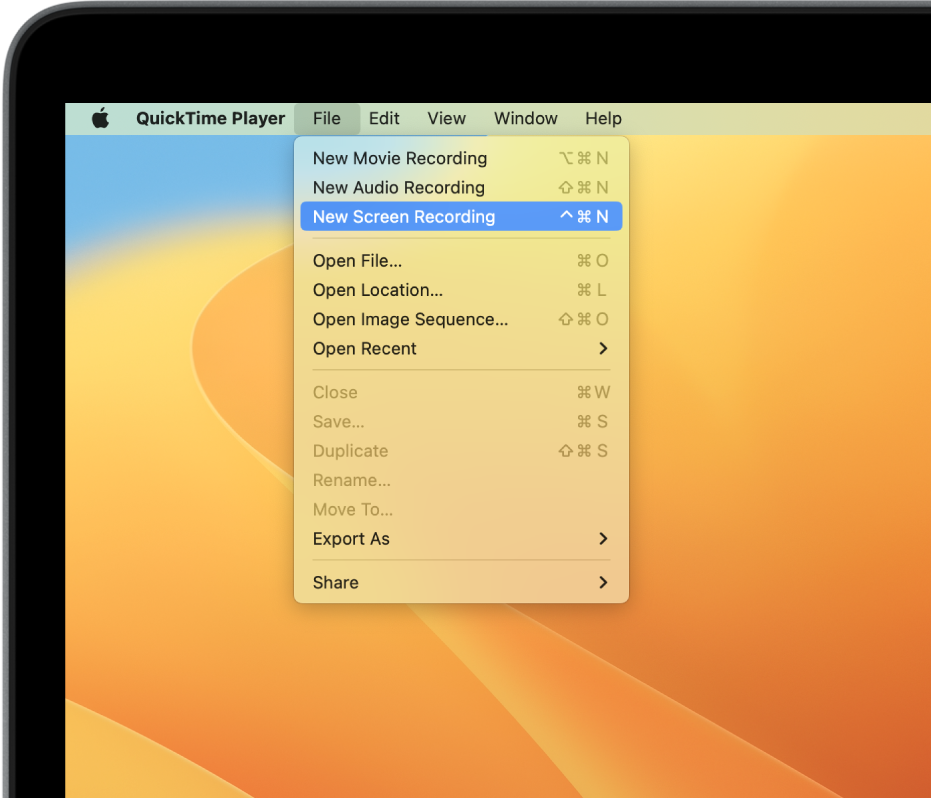
- Initiate New Screen Recording: From the menu bar, select File > New Screen Recording. A small recording window will appear.
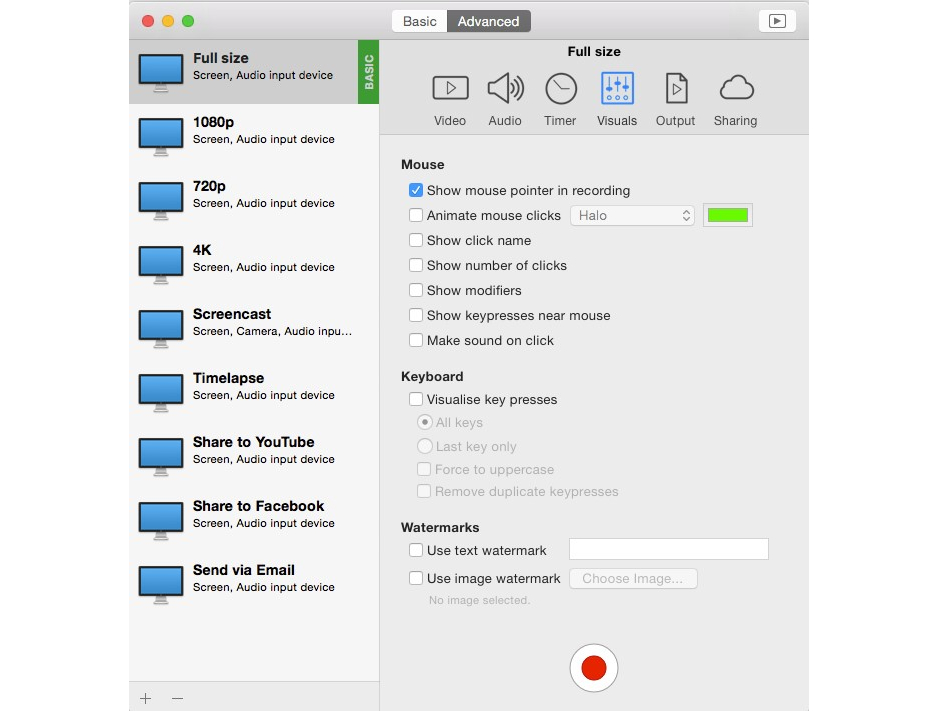
- Choose Recording Preferences: Click on the arrow next to the red record button. Here, you can choose the microphone for recording sound and other options.
- Start Recording: Click the red record button, then choose whether you want to record the full screen or a selected portion.
- Stop Recording: Click the stop button in the menu bar or press Command + Control + Esc.
- Save the Recording: After stopping the recording, QuickTime will automatically open the recorded video. You can then save it by selecting File > Save.
Pros
- Pre-installed: QuickTime Player comes pre-installed on Mac, requiring no additional downloads or installations.
- User-Friendly: The application is straightforward and easy to navigate, making it suitable for users who prefer a simple, no-fuss screen recording process.
- Versatility: In addition to screen recordings, QuickTime allows for the capture of audio recordings and the playing of media files.
Cons
- Limited Editing: QuickTime doesn’t offer advanced editing features for post-recording modifications.
- Basic Features: The features are quite basic, lacking advanced customization and recording options seen in professional screen recording software.
2. Using Shift + Command + 5
MacOS Mojave and later versions have a built-in screen recording feature that can be accessed by pressing Shift + Command + 5. This feature presents a user-friendly interface, providing options to capture the entire screen, window, or selected portion.
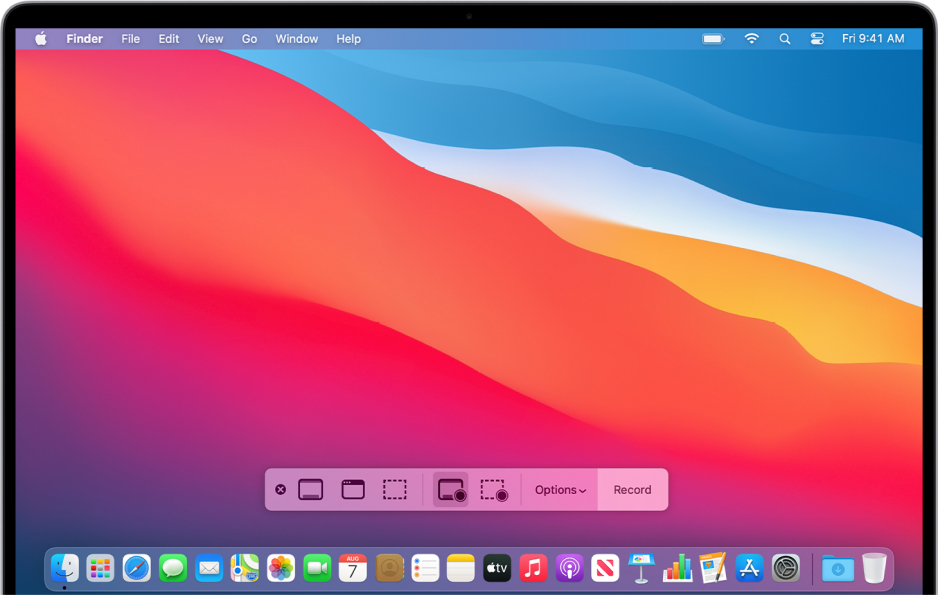
- Access Screen Recording Tool: Press Shift + Command + 5 to open the screen recording tool.
- Choose Recording Type: At the bottom, select whether you want to capture the entire screen, a window, or a selected portion.
- Select Microphone: On the control bar, click Options and select the microphone you want to use under the “Microphone” section.
- Start Recording: Click Record to start your screen recording.
- Stop Recording: Click the stop button in the menu bar to finish recording.
- Preview and Save: A thumbnail of the recording will appear in the corner of the screen. Click it to preview, edit, and save the recording.
Pros
- Integrated Shortcut: The feature is integrated into MacOS Mojave and later versions, making it highly accessible.
- Flexible Recording Options: Users have the flexibility to choose between capturing the entire screen, a window, or a specific portion of the screen.
- Microphone Selection: Allows for the selection of different microphones directly within the recording interface.
Cons
- Limited Customization: This tool lacks advanced customization features such as changing the recording frame rate or adding annotations during the recording.
- No Built-in Editing: There is no built-in editing feature, so users may need a separate tool for post-recording edits.
3. Using iShowU Instant
iShowU Instant is a third-party application popular for its advanced screen recording features. It allows for the capture of video and audio simultaneously, with extensive customization options.
- Download and Install: Visit the official website to download and install iShowU Instant.
- Configure Settings: Open the application and configure the settings, such as audio sources, output format, and hotkeys.
- Select Recording Area: Choose whether to record the full screen or a specific area.
- Start Recording: Use the configured hotkey or click the record button within the application.
- Stop Recording: Press the stop button or use the hotkey to finish recording.
- Save and Edit: The recording will be saved automatically in the chosen location. You can also access editing features r further refinement.
Pros
- Advanced Features: The software comes with advanced features, such as customizable shortcuts and multiple audio source selections.
- Customizable Output: It offers various output formats and quality settings to customize the recorded video according to user needs.
- Real-time Audio: The application provides real-time audio output, enabling users to listen while recording.
Cons
- Paid Software: iShowU Instant is not free, which might deter users looking for a cost-effective solution.
- Complex Interface: Its multitude of features might make the interface a bit complex for users who are new to screen recording.
4. Using ScreenFlow
ScreenFlow is a professional screen recording application that offers extensive editing capabilities and powerful screen recording features, making it suitable for creating high-quality tutorials and presentations.
- Download and Install: Obtain ScreenFlow from their official website or the Mac App Store and install it.
- Create New Document: Open ScreenFlow and create a new document by selecting File > New.
- Configure Recording Settings: Choose the recording sources, like the screen and microphone, and set the other parameters.
- Start Recording: Click the red record button to initiate the recording process.
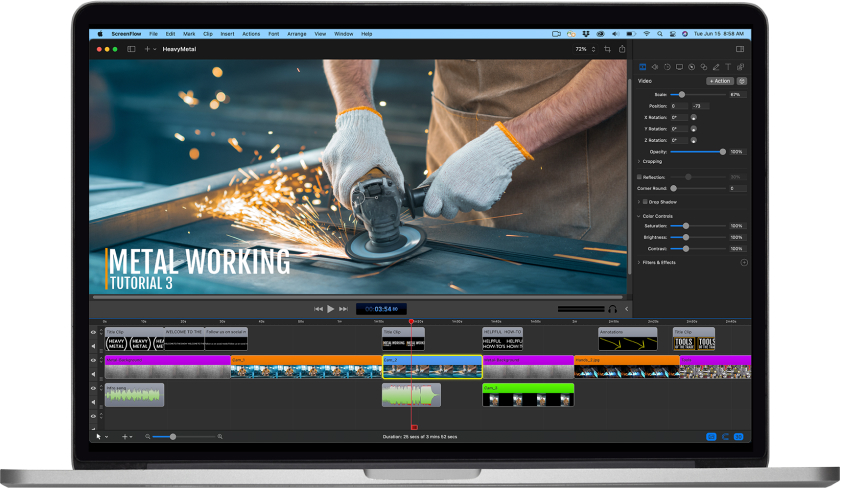
- Edit Recording: After stopping the recording, you can utilize ScreenFlow’s editing tools to enhance your video.
- Export Video: Once editing is complete, export your video by selecting File > Export.
Pros
- Professional Editing Tools: ScreenFlow offers a suite of professional editing tools for enhancing recordings post-capture.
- High-Quality Recordings: It allows for the creation of high-quality, smooth screen recordings suitable for professional use.
- Multi-source Recording: Users can record from multiple sources, including the screen, webcam, and microphone simultaneously.
Cons
- Cost: ScreenFlow is a premium software, making it less accessible for users seeking free options.
- Steep Learning Curve: Due to its advanced features, new users might find it somewhat challenging to navigate at first.
5. Using OBS Studio
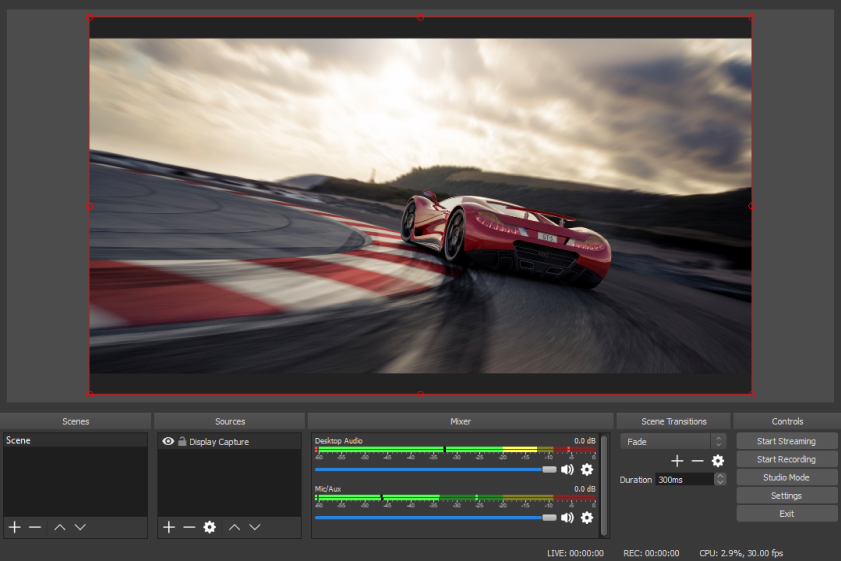
OBS Studio is a robust, open-source screen recording and streaming tool. It’s highly customizable, allowing for the recording of both screen and audio with various settings and filters to optimize the recording.
- Download and Install: Visit the OBS Studio official website to download and install the application.
- Create a New Scene: Open OBS Studio, create a new scene by clicking the “+” button at the bottom of the scenes box.
- Add Sources: Click the “+” button in the sources box to add your screen and audio input as sources.
- Configure Settings: Go to Settings to configure output, audio, and video settings according to your preferences.
- Start Recording: Click ‘Start Recording’ at the lower-right corner to begin capturing your screen and audio.
- Stop and Save: Click ‘Stop Recording’ when finished. The recording will be saved automatically in the designated output folder.
Pros
- Free and Open-Source: OBS Studio is free and open-source, making it accessible to a broad range of users.
- Highly Customizable: Offers an extensive range of customization options, from sources and scenes to filters and settings.
- Streaming Capabilities: Aside from recording, OBS Studio is well-equipped for live streaming, making it versatile for various content creation needs.
Cons
- Complex Interface: New users might find OBS Studio’s interface and multitude of options somewhat overwhelming.
- Resource-Intensive: OBS Studio can be quite resource-intensive, possibly leading to performance issues on less powerful systems.
Each method has its unique features and advantages, catering to different needs and preferences. Choose the one that aligns best with your screen recording requirements and follows the instructions to capture high-quality screen recordings complete with sound.
| Feature/Tool | QuickTime Player | Shift + Command + 5 | iShowU Instant | ScreenFlow | OBS Studio |
| Built-in/Third-party | Built-in | Built-in | Third-party | Third-party | Third-party |
| Cost | Free | Free | Paid | Paid | Free |
| Ease of Use | High | High | Medium | Medium | Low |
| Editing Features | Limited | None | Advanced | Advanced | Advanced |
| Customization Options | Limited | Limited | High | High | High |
| Microphone Recording | Yes | Yes | Yes | Yes | Yes |
| Multi-source Recording | No | No | Yes | Yes | Yes |
| Streaming Capabilities | No | No | No | Limited | Yes |
| Pros | Pre-installed
User-friendly Versatile |
Integrated Shortcut
Flexible Recording Options Microphone Selection |
Advanced Features
Customizable Output Real-time Audio |
Professional Editing Tools
High-Quality Recordings Multi-source Recording |
Free and Open-Source
Highly Customizable Streaming Capabilities |
| Cons | Limited Editing
Basic Features |
Limited Customization
No Built-in Editing |
Paid Software
Complex Interface |
Cost
Steep Learning Curve |
Complex Interface
Resource-Intensive |
Conclusion
Choosing the right screen recording tool on your Mac largely depends on what you want to accomplish. Whether it’s for basic screen capturing tasks, creating professional tutorials, or live streaming, there is a tool out there to meet your needs. Built-in options like QuickTime Player and the Shift + Command + 5 shortcut offer simplicity and convenience, making them suitable for quick and straightforward recordings. In contrast, third-party options like iShowU Instant, ScreenFlow, and OBS Studio bring more advanced features and customization, catering to more detailed and professional recording and editing needs.
Frequently Asked Questions (FAQ)
Q: Can I record both screen and audio simultaneously using these tools?
A: Yes, all the mentioned tools allow for the simultaneous recording of screen and audio. However, the process to enable and manage these settings varies from tool to tool.
Q: Which screen recording tools are free to use?
A: QuickTime Player, Shift + Command + 5, and OBS Studio are free to use. iShowU Instant and ScreenFlow are paid tools but may offer trial versions with limited functionalities.
Q: Which tool is best for live streaming?
A: OBS Studio is highly recommended for live streaming due to its extensive customization options and streaming capabilities. It allows for streaming to various platforms with advanced scene and source configurations.
Q: Can I edit my recordings within these tools?
A: Tools like ScreenFlow and iShowU Instant come with built-in editing features, allowing for post-recording modifications directly within the application. QuickTime Player offers basic editing, while Shift + Command + 5 and OBS Studio lack integrated editing tools.
Q: What if I only want to record a specific part of my screen?
A: Most tools, including QuickTime Player, Shift + Command + 5, iShowU Instant, ScreenFlow, and OBS Studio, allow users to select specific screen areas or windows for recording instead of capturing the entire screen.
Q: Can these tools record video from my webcam along with the screen?
A: Yes, tools like ScreenFlow, OBS Studio, and iShowU Instant allow for simultaneous recording from multiple sources, including the screen and webcam, facilitating picture-in-picture recordings.
Q: Which tool is best for beginners who have minimal experience in screen recording?
A: QuickTime Player and the Shift + Command + 5 shortcut are excellent choices for beginners due to their user-friendly interfaces and straightforward functionalities.
Q: Can these tools record in various file formats?
A: The availability of various file formats depends on the tool. Tools like OBS Studio, ScreenFlow, and iShowU Instant allow users to choose from different file formats, whereas QuickTime primarily saves files in .MOV format.
Q: Are there tools that allow for real-time annotations during the recording?
A: Dedicated real-time annotations are not commonly found in basic tools like QuickTime Player and the Shift + Command + 5. However, third-party software like ScreenFlow offers such advanced features.
Q: Is it possible to schedule recordings in advance with these tools?
A: Advanced third-party tools like iShowU Instant allow for scheduled recordings. Basic tools like QuickTime Player and the Shift + Command + 5 shortcut don’t support this feature.

Chief Editor. video operator with 12 years of experience in commercial filming of advertising, TV series and short films. More than 5 years of experience in CGI and post-processing on AAA projects.
Contact me if you need help with a particular buying issue, haven’t found a product you’re interested in.