

Are you tired of explaining complicated processes to your tech-challenged aunt over the phone? Or maybe you want to create engaging tutorials for your YouTube channel? Look no further! QuickTime, that trusty multimedia player on your Mac, is here to the rescue. In this article, we’re going to dive deep into the world of screen recording with audio using QuickTime.
So, if you’ve ever wondered how to make your own screen recordings complete with crystal-clear audio narration, you’re in the right place. We’ll walk you through the process step by step, share some cool tips and tricks, and sprinkle in a bit of humor along the way. Let’s get started!
Setting the Stage: Preparing Your Mac
Before we jump into the recording process, let’s make sure your Mac is all set up for action. Here’s what you need to do:
1. Check Your Microphone

Your microphone is the gateway to capturing audio alongside your screen recording. Before starting, double-check that your microphone is correctly plugged in and functional. Here’s how:
- Physical Check: Inspect the microphone connection. Ensure it’s securely plugged into your computer’s microphone jack or USB port.
- Sound Check: You have the option to utilize the integrated sound settings on macOS for keeping an eye on your microphone’s input volume and fine-tuning it as necessary.
- External Microphones: To optimize your audio experience with an external microphone, such as a USB condenser mic, ensure it’s designated as the primary input device on your Mac through the sound preferences. Begin by accessing “System Preferences,” followed by “Sound.” Subsequently, navigate to the “Input” tab and pick your preferred microphone from the array of options.
2. Locate QuickTime
QuickTime Player is typically pre-installed on macOS, but it’s always good to know where to find it. Here’s how to locate it:
- Spotlight Search: Simply press Command + Spacebar to open Spotlight Search, and type “QuickTime Player.” It should appear in the search results, and you can launch it from there.
- Applications Folder: You can also find QuickTime Player in your Applications folder. Open Finder, go to “Applications,” and look for the QuickTime Player icon—a stylized “Q” in a blue circle.
3. Update QuickTime (If Needed)
Keeping your software up to date is essential for optimal performance and to ensure you have access to the latest features and bug fixes. Here’s how to check for updates:
- Apple Menu: Click on the Apple menu in the top-left corner of your screen, then select “System Preferences.”
- Software Update: In System Preferences, click on “Software Update.” macOS will check for available updates, including QuickTime Player. If an update is available for QuickTime, you’ll be prompted to install it.
With your Mac prepped and QuickTime up to date, let’s get started on your screen recording adventure.
Getting Started: What is QuickTime and Why Use It?
QuickTime: The Mac Maverick
Before we delve into the nitty-gritty of screen recording, let’s get acquainted with our star player: QuickTime. QuickTime is Apple’s go-to multimedia framework for handling various digital video, audio, and interactive content. It’s like the Swiss Army knife of media players, and guess what? It’s already installed on your Mac!
A Rich History:
QuickTime embarked on its path back in 1991, courtesy of Apple’s introduction, serving as a multimedia framework tailored for Macintosh computers. Over the course of time, it has seen a multitude of enhancements and refinements, morphing into a versatile utility for multimedia playback, editing, and, naturally, screen recording. Its extensive and rich heritage stands as a testament to its unwavering appeal among the Mac user community.
All-In-One Multimedia Solution:
QuickTime isn’t just about screen recording; it’s a Swiss Army knife for all things multimedia. It can play an array of audio and video formats, making it a one-stop-shop for your media needs. From watching movies to editing videos and even recording your screen with audio, QuickTime has got it all covered.
Built-In Convenience:
One of the standout features of QuickTime is that it comes pre-installed on every Mac. You don’t need to hunt for third-party applications or worry about compatibility issues. It’s there, sitting in your Applications folder, ready to spring into action whenever you need it. That’s the kind of convenience that Mac users cherish.
Simplicity and User-Friendliness:
QuickTime’s user interface is a model of simplicity and user-friendliness. You don’t need an advanced degree in software engineering to figure it out. Whether you’re a tech guru or a newbie to screen recording, QuickTime’s intuitive design ensures you can start recording in minutes.
Audio Recording Magic:

One of QuickTime’s standout features is its ability to capture not only your screen but also high-quality audio. This is a game-changer for anyone creating tutorials, vlogs, or any content where audio narration is crucial. Your voice can now accompany your screen actions seamlessly.
Cost-Effective Awesomeness:
Let’s not forget the best part: QuickTime is absolutely free! While there are plenty of paid screen recording software options out there, QuickTime proves that sometimes, the best things in life are free. It’s a gift from Apple to its users, and it’s a gift that keeps on giving.
Why Choose QuickTime?

Now, you might be wondering, “Why should I choose QuickTime for screen recording when there are other options out there?” Well, here’s the scoop:
- It’s Free: You don’t need to spend a dime because QuickTime comes bundled with your Mac.
- User-Friendly: QuickTime’s intuitive interface makes it a breeze for beginners and seasoned users alike.
- High-Quality Output: QuickTime produces top-notch video and audio recordings.
- Audio Recording: It allows you to record not only your screen but also your voice or any other audio source.
- Built-In Editing: You can trim, crop, and make basic edits to your recordings right within QuickTime.
Now, let’s roll up our sleeves and start recording that screen with audio using QuickTime.
Step 1: Launching QuickTime Player
The first step to becoming a screen recording maestro is to open QuickTime Player. You can find it in your Applications folder or simply use Spotlight Search (Command + Space, type “QuickTime Player,” and hit Enter). Got it open? Fantastic! Now, let’s move on.
Step 2: Choosing the Right Recording Mode
QuickTime offers several recording modes to cater to your needs. To record your screen with audio, follow these steps:
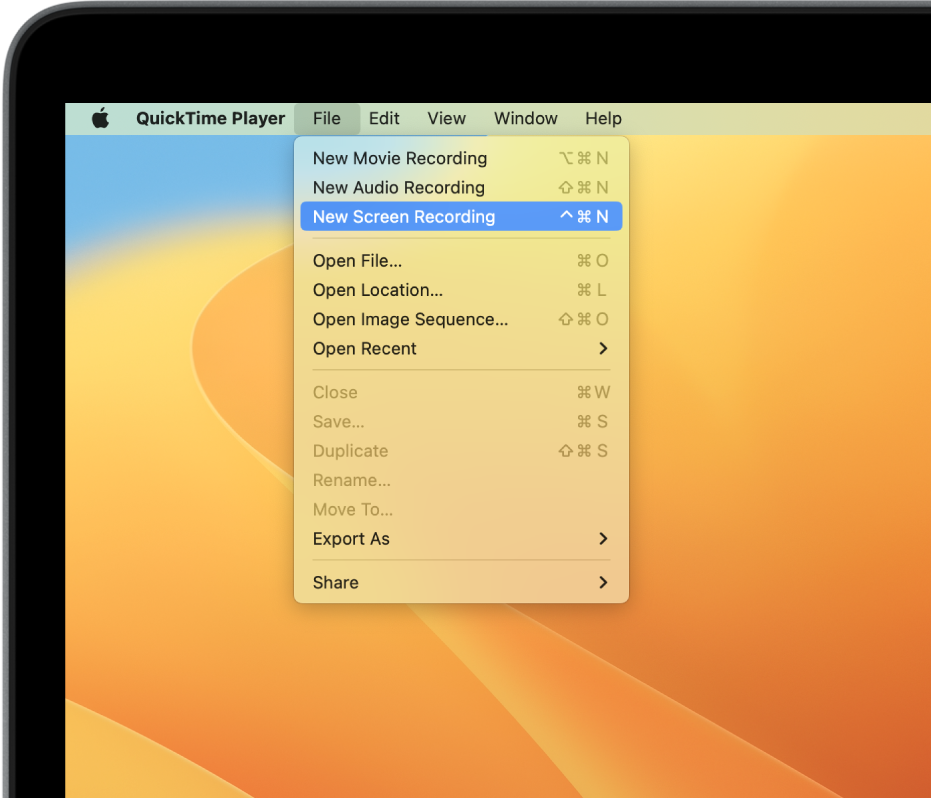
- Click on “File” in the top menu bar.
- Select “New Movie Recording.”
Now, you’re ready for the next exciting step.
Step 3: Configuring Audio Settings
Before we hit the record button, let’s ensure our audio settings are spot on. Click the little arrow next to the record button and select your microphone from the dropdown menu. This will ensure QuickTime captures your melodious voice or any other audio you want to record.
Step 4: Record Your Screen
This is where the magic happens. Are you ready? Take a deep breath and click the red record button. QuickTime will give you a countdown, and then it’s showtime!
Step 5: Stop and Save
Once you’ve finished your screen recording, click the stop button in the menu bar. You’ll be prompted to save your masterpiece. Give it a name, choose a destination, and click “Save.”
Step 6: Edit Your Recording (Optional)
QuickTime allows for basic editing of your recordings. Open your freshly saved video, click “Edit” in the menu bar, and explore the editing tools. Trim away any unnecessary bits or enhance your content as needed.
Tips and Tricks for Screen Recording Nirvana
Now that you know how to use QuickTime for screen recording with audio, let’s sprinkle in some pro tips to help you level up your game.
1. Plan Your Content
Before hitting that record button, take a moment to plan what you’re going to say or do. It’ll save you editing time later and make your content more engaging.
2. Clean Up Your Desktop
Nobody wants to see your cluttered desktop while you’re recording. Tidy up your screen to give your viewers a more professional and distraction-free experience.
3. Edit and Enhance
QuickTime is a fantastic tool for capturing raw footage, but it’s not a full-fledged video editor. Consider using video editing software to polish your recording, add captions, and include additional effects.
4. Be Mindful of Audio
Test your microphone and audio levels before recording. Nobody enjoys straining to hear your voice or being blasted by excessive noise.
5. Save Your Work
Always remember to save your recordings and create backups. You never know when you might need them in the future.
Conclusion
Screen recording with audio using QuickTime is a breeze once you know the ropes. It’s a powerful yet user-friendly tool that can help you create captivating tutorials, share your gaming exploits, or even assist a tech-challenged relative from afar. Remember, practice makes perfect, so don’t be discouraged if your first recording isn’t Oscar-worthy. Keep experimenting, refining your skills, and soon you’ll be a screen recording maestro.
And there you have it – a comprehensive guide to effortlessly recording your screen with audio using QuickTime. We hope you found this article helpful, and may your screen recordings always be pixel-perfect and crystal clear!
FAQs (Frequently Asked Questions)
1. Can I record system audio with QuickTime?
Yes, you can record system audio along with your screen using QuickTime. Just configure your audio settings to capture the system sound.
2. How can I record a specific application window?
To record a specific application window, select the “New Screen Recording” option in QuickTime, and then click on the application window you want to record. QuickTime will capture that window.
3. Can I add annotations or text to my screen recordings in QuickTime?
QuickTime’s built-in editing features allow you to trim and crop your recordings, but for more advanced annotations and text overlays, you may want to use video editing software like iMovie or Adobe Premiere.
4. Is QuickTime available for Windows?
QuickTime Player is primarily available for macOS. However, there used to be a version for Windows, but Apple has discontinued it. Windows users can explore alternative screen recording software options.
5. What’s the maximum recording duration in QuickTime?
QuickTime doesn’t impose a strict time limit on screen recordings, but the duration may be limited by your available storage space. Ensure you have enough free space to accommodate your recording’s length.

Chief Editor. video operator with 12 years of experience in commercial filming of advertising, TV series and short films. More than 5 years of experience in CGI and post-processing on AAA projects.
Contact me if you need help with a particular buying issue, haven’t found a product you’re interested in.